
For these Snow Globe ornaments I bought 70 mm fillable clear plastic ornaments. For each ornament I cut a cardstock circle that sat on the ledge inside the outer half ball. The interior of the ball was less than 70 mm so I couldn't use that dimension when I cut the circles. Instead I took the inside half ball, the one with the ledge on the outside,

laid it on the cardstock and used a fine pencil to draw around it.
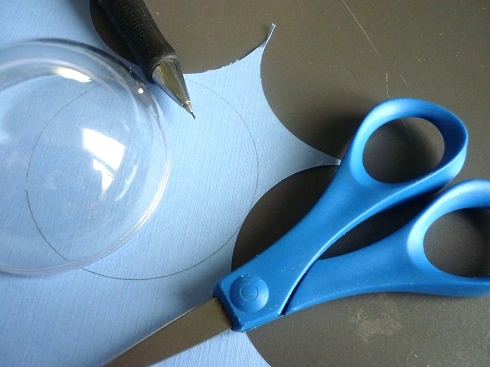
Then I cut just a tiny bit inside the pencil line,

so that the circle fit on the ledge without dimpling or falling inside. (It sometime took a few tries to get it just right but after I had one that worked I could use it as a template.)

For each snow globe ornament I used 2 stitched pieces. These ones were stitched on 25 count fabric using an original design that I call Crayon County Snow Globes. Charts for these designs can be found by clicking on the image below.


The stitched design measured about 50 mm across,

and I decided that I would cut them so that cardstock and fabric showing around the stitching would be approximately the same width. I chose to cut them so that the fabric would be 60 mm across. I wanted to back them with white cardstock so I used a circle cutter to cut two 60 mm white cardstock circles.

If I hadn't owned a circle cutter I could have used a compass to draw the circles on the cardstock and then cut them out with scissors.

Before I mounted the fabric on the cardstock I pressed the stitched pieces. I placed them on felt, placed a damp cloth over them and then applied a hot iron.

After they were cool and dry I marked them so that I could more easily center them on the cardstock circles. I placed a pin on the left edge of the stitched design,

placed one of the cardstock circles over the stitched design and used another pin to mark the right edge of the cardstock circle.

When I removed the cardstock circle

I discovered that there were 12 threads between pin and the edge of the stitching.

I used a needle and thread to make a long stitch 6 threads (12 divided by 2) from the outer edge of the stitched piece,

and more long stitches the same distance from the top, left side and bottom of the stitched design.

I laid the stitched piece face down on a piece of felt and applied decoupage medium to the outside edge of one of the cardstock circles. (I chose to use decoupage medium because it is thinner than most glues and I believed that it would soak more into the fibres of the fabric and help prevent fraying.)
 I gently laid the cardstock circle, glue side down onto the fabric.

When I was satisfied that it was well centred I put a small clear plastic bag over the cardstock circle and used my fingers to lightly press the cardstock and fabric together. (The main purpose of the plastic bag was to keep me from getting glue all over my fingers and then transferring it where I didn't want it!)

I flipped over the stitched piece, put it in a bag (where I knew there was no glue residue!) and used my finger to firmly press just the unstitched fabric flat against the cardstock circle.

After I repeated these steps for the other stitched piece I laid them both face down on the felt,

covered them with a plastic bag (or plastic film),

weighted them down with a heavy book and left them to dry.
And while we're waiting for them to dry I will demonstrate how I center the cardstock when there isn't an edge to edge design. For the stitched piece below I used a metallic filament thread to mark the centerlines of the stitched piece and a pencil to mark the centerlines on the cardstock circle.

Then I flipped over the stitched piece, applied glue to the other side of the cardstock circle, lined up the centerlines and pressed the circle to the fabric. Before continuing I removed the metallic filament thread.

When the decoupage medium was dry I was ready to proceed.
Because I didn't think that the decoupage medium had completely saturated the fabric threads I also wanted to treat them from the top. I could have used a fine brush to apply more decoupage medium but I instead decided to use a fast drying, fray preventing solution. I used just enough to make sure that the area corresponding to the edge of the cardstock was covered.

When they were dry I was ready to cut the fabric. With the cardstock circle facing me I used long smooth squeezes of the scissors (not choppy snips) to cut exactly along the edge of the cardstock.


When they were both cut I was ready to glue them to the larger, blue cardstock circle.

I again used decoupage medium, but I could have used a thicker glue. I applied it a little more liberally than I had before,

then flipped it over, centered it on the blue cardstock circle, placed a clear plastic bag on top and pressed it firmly in place.

Then I flipped it face down on the felt, covered it with a plastic bag
 and weighted it down with a heavy book while it dried.
When it was dry I used a pin to poke a hole in the cardstock to indicate the top center of the fabric piece

and used this mark to find the top center when I glued the second stitched piece to the other side of the blue cardstock circle.


When that was dry I was ready to assemble the ball.
When I made the penguin ornament I used small pearl beads to simulate snow but afterwards I wondered if, over time, they might scratch the inside of the ball. This time I searched for tiny white pompoms but I was unsuccessful. I settled on using tiny foam pellets. I didn't know where I could buy them locally so I bought a dollar store travel pillow, made a small hole in a seam and squeezed some into a bowl.

I set the half ball that had;the inside ledge in a jar lid, so it wouldn't roll around, and placed about a teaspoon of foam pellets in the ball.

Then I used a soft brush to brush away any cut thread debris from both sides of the stitched piece

and carefully laid the cardstock and fabric sandwich in the half ball so that the top of the stitched piece corresponded with the top of the ornament and the cardstock rested on the inside ledge.

Next I carefully piled about a teaspoon of beads onto the top of the stitched design.

I applied a few drops of model cement onto the hanger part of the ball half and

carefully placed the other ball half over the top so that the hanger parts lined up.
I pressed the hanger parts together then snapped the rest of the ball together before I squeezed the hanger part for the length of time indicated on the model cement instructions.


I didn't want to rely on the model cement (I probably shouldn't have bought the child safe version!) so I made sure that my decorative bow was tied tightly.


 Pinwheel 2018

These are beautiful! Thank you for the tutorial! (Clicking on the link took me to "Sorry, the page you were looking for in this blog does not exist." I'm not complaining but thought you'd want to know.)
ReplyDeleteI took the pattern page offline for a few of hours today while I rejigged the pdfs. Going by the time stamp for your comment it looks like you tried the link about an hour before the page was up and running again.
ReplyDeleteIt should be working now.