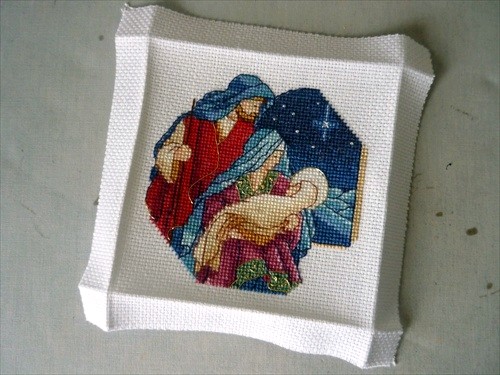
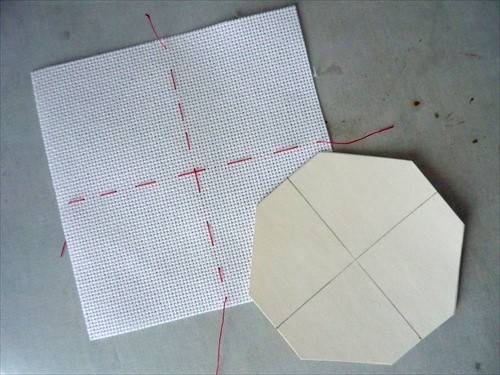
For square or rectangular ornaments I usually press lines or baste lines to mark the desired height and width of the ornament. When these lines follow the weave of the fabric I know that the ornament will be perfectly straight.

From Dimensions kit "Beaded Elegance".
Then I center the padded backing board over the back side of the stitched piece.

When I made this octagonal padded ornament I used pins and pressed lines.

Adapted from Dimensions kit "Silent Night Banner".

It worked well but when I used the same method on a Santa ornament, that was stitched closer to the fold lines, I wished that I had taken an extra step to center this ornament because the narrower border around the stitched design made it obvious that the pressed square wasn't enough to keep the border equal all the way around. I had used double sided tape so I was able to lift and shift the four folded over edges that I had already stuck down.

Adapted from a Bucilla kit, Santa & Baby
I could have prevented this if I had basted a line that corresponded to all 8 edges, like I did when I made 18 of these ornament in 2007,

or on these three sided ornaments in 2010

Alternatively I could have basted the center lines of the design and matched them with center lines drawn on the back of the backing board.


The latter method is one that I wished I had used when I made some three sided ornaments. For those I centered the stitched piece by poking a pin through the center of the cardstock and through the center point of the stitched piece. I then lined up the points of the cardstock to the pins that marked the center line of the stitched piece

It would have been easier to keep this ornament centered while cutting and folding if I had marked the center lines of stitched piece and the cardstock.


This is a good method to use when assembling an oval ornament but for a circular ornament I find I can get away with just using the pin in the center or a few pins to mark the edge.

Adapted from Told in a Garden's "2004 Christmas Free Design".
Especially if I am going to gather

and then lace it.


 Pinwheel 2015
Hi, I found your blog via Wild Olive, where you mentioned your post about yo yos. I am writing a post for my blog (I am a fairly new blogger) and I wondered if you would mind me linking to your post. I am writing about the way I make yo yos and also mentioning your tutorial and Wild Olives too. Is that Ok with you?
ReplyDeleteThank you for asking. I have no problem with you posting a link to my blog.
DeleteThis comment has been removed by a blog administrator.
ReplyDeleteThis comment has been removed by a blog administrator.
ReplyDeleteThis comment has been removed by a blog administrator.
ReplyDeleteThis comment has been removed by a blog administrator.
ReplyDeleteThis comment has been removed by a blog administrator.
ReplyDeleteThis comment has been removed by a blog administrator.
ReplyDeleteThis comment has been removed by a blog administrator.
ReplyDelete