In general this ornament is put together the same as my Three Sided Ornament. These notes are just to explain the differences, or to illustrate steps that weren't well illustrated on that earlier tutorial.
The changes I made to the design.
* I omitted the background violet (#340) so the image stands out better from a distance.
* I omitted the stars.
* I simplified the facial features. I just used two tiny stitches for the eyes.
* I added a triangle to the top and bottom of the violet frame. The top triangle starts above the crown and it is ten stitches tall.

The triangle at the bottom is 9 stitches tall and starts under the camels' feet.
* I used Sulky Sliver Metallic thread to baste a line of running stitches that is 16 stitches above the violet triangle at the top, 12 stitches out from the violet frame on the side and 16 stitches from the violet triangles at the bottom.

I folded the stitched designs over card stock (blank business cards) and felt.
The cards are approx. 2 1/2 inches tall. I used my quilting ruler to cut the three cards 1 1/2 inches wide and to mark the top and bottom center points 3/4 of an inch from the sides. Then I used it to score lines 3/4 of an inch from the top and bottom.

I cut the corners off, from the scored lines to the center points on the top and bottom. I applied a bit of glue (glue stick) to the three pieces of card stock and stuck them to white felt. (If one is using business cards with printing the white side should be stuck to the felt.) When the glue was dry I cut the felt around the card stock hexagons.
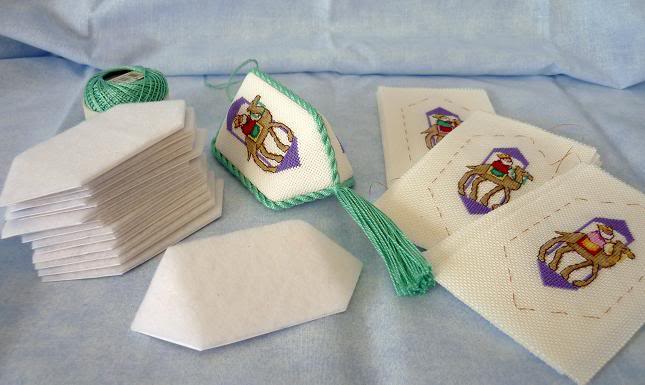
Below are photos of: the pattern, one of the cardstock hexagons glued to felt and one of the stitched pieces.

I cut the corners from each stitched piece and placed them face down on my work surface. I placed one of the hexagons, felt side down, on each stitched piece. I folded and glued the sides of the stitched pieces to the card stock. (I used fast drying FabriTac glue. I could also have used double sided tape. If I had used any thing else I would have held the folded edges in place with clothespins until it was dry.) When the glue was dry I folded and glued the sloped edges to the card stock.

Then I was ready to sew the ornament together.
The photo below shows the order that I stitched the ornament together. I began by sewing the first piece to the second piece. I used a piece of thread that was approx. 20 inches long. I began at A and left a tail about 5 inches long. (So I could later sew from A to Z.) Using a ladder stitch I sewed from A to B then B to C.

Then I passed the thread under the fabric from C to D, very close to the top point, before I sewed the second piece to the third piece from D to E.
I have two photos that detail how I did these seams. In the first photo I leave the ladder stitch at the top loose so you can see the order of stitching.

This is what it looks like when the threads are pulled snug and it is sewed together from A to E.

I continued sewing from E to F to G. Then I passed the needle under the point from G to H,

and continued sewing from H to I to J to K. As I approach the point I used a spare tapestry needle to make sure that the raw edges were pushed well inside the ornament.
To finish my thread, and to pull the pieces together, I tunneled under the fabric from seam to seam several times.

Each time I emerged a little further from the point.

I tugged on the thread, cut it close to the surface of the fabric and watched it disappear under the fabric. Finally I threaded the 5 inch tail of thread I had left at A. I stitched the seam from A to Z and finished the thread as above. I removed the basting stitches.
To finish the ornament I made three pieces of cording, each using 9 lengths of 17 inch long #8 Perle thread. (Or 4 lengths of 6 strand embroidery floss.) I glued the cording to the seams and made the tassel. These steps are described in detail on my Twisted Cord and Tassel Tutorial.


I had hoped to find some matte finish star beads for the hanging string for these ornaments. The closest I got were some 6mm grey hematite beads. The shop owner was sceptical when I said that maybe I would be able to paint them or something. Later that day I found some star stickers that were the exact same size as the beads. Not quite what I was looking for, but at least the Wise Men have a star to follow.


Pinwheel 2010

wow, amazing work!
ReplyDeleteThanks Chris! It was a fun project.
ReplyDeleteI have been using your tutorials to teach myself how to finish ornaments with the twisted tasseling. Thank you so much. Your tutorial has been very helpful to me. Keep up the delightful work. I like looking at all your wonderful finished projects.
ReplyDeleteThank you for you kind works Shannon!
ReplyDeleteYour work is incredible / commendable ! I don't think, I would be able to pull-off something so intricate with so much 'finish' and that too - so many pieces. Every detail is wonderfully done. God bless.
ReplyDeleteCan you tell us how much floss one of these three sided (beautiful) ornaments uses for both the embroidery and the rope and the tassels? Thank you.
ReplyDeleteYour work is amazing! I would love to make some of your ornaments. Do you sell your patterns.
ReplyDelete