The materials I used for this project were:
* two cross stitched pieces
* one 2 1/2 inch styrofoam ball
* gold seed beads
* sharp, rust proof pins
* double sided tape
* approx. 8 inches of upholstery braid
* gold coloured cord
* two pieces of wide ribbon
* a piece of fray free fabric approx. 4 inches by 8 inches
(I used Ultrasuede for this tutorial but at the bottom of this page I include some photos of one done with good quality felt.)
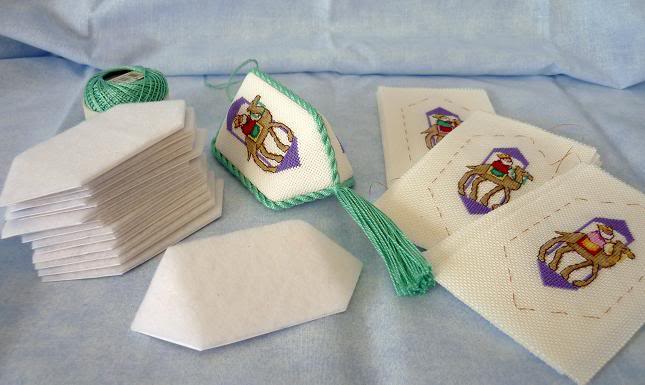
After I finished my framed ball ornament experiments I was eager to stitch something so I could put together a tutorial. I chose the Cathedral Quilt Ornament design from Just Cross Stitch December 2008. I changed the floss colours, to match the ultra suede and ribbons that I had on hand, and I stitched it on 25 count antique white fabric. (Some of the photos on this page use stitched designs with slightly different floss choices.) After I had stitched it twice,

I measured the design. I used a circle template but, as I will demonstrate later, a strip of paper will give you all the information you need. The design was 1 3/4 inches in diameter.
(Note that if I had chosen a design that was less circular and had less pronounced mid lines I would have added lines of temporary basting stitches to mark the circle and/ or the mid lines.)

The trick to easily fitting two pieces of flat fabric onto a round ball is to cut the fabric into squares that have a diagonal that is half the circumference of the ball. For this 2 1/2 inch ball I needed two squares of fabric each about 2 13/16 inches by 2 13/16 inches. For a three inch ball I would have needed two squares of fabric each 3 3/8 inches x 3 3/8 inches. (Click here to learn two math free ways to generate square patterns for other sizes of balls.)
To center the cross stitch design on the square I made a paper pattern of the square and folded the paper on the diagonal to make an X that marked the center. I centered this X over the center of my cross stitched designs and then cut the fabric, using the weave of the fabric to make straight cuts. (For a different design horizontal and vertical folds may been more helpful.)

Before I applied the fabric squares to the ball I "measured" the ball so I could later make the pattern for the ultra suede donut. I didn't use a measuring tape for this because a strip of paper gives me all the information I need. I wrapped the strip of paper around the fattest part of the ball and inserted a pin to mark the spot where the paper overlaps the starting point.

I removed the pin,

cut the paper at the pin mark and set the strip of paper aside for later. Then I was ready to apply the fabric squares to ball. I like to use smooth polystyrene balls that have an obvious center line,

because I can apply the fabric so that the corners of the fabric squares touch the center line. But, if the ball doesn't have an obvious center line the corners of the fabric will dictate a center line. In order to demonstrate this I chose to ignore the center line on this ball. I pinned one corner of one of the square pieces of fabric to the ball. I stretched the diagonal of the fabric a little and then pinned the opposite corner to the ball. (The stretching helps the flat fabric fit the round ball.)

I pinned two corners of the other square of fabric to the ball so that its corners overlapped the first just a little. (Though the diagonal of the fabric squares equaled half the circumference of the ball they overlapped because I had stretched the diagonals.)

I overlapped and pinned two free corners of the two pieces of fabric then stretched the diagonals of the fabric squares so I could overlap and pin the last two corners. (If the cross stitch designs I was using had a definite "top" I would now check that the two tops were adjacent to each other.)

Once all corners were pinned I used a pencil eraser to push the pins snugly against the ball.

I pinned the edges of the fabric to the ball using two pins on each edge. I checked that adjacent "bumps" in the fabric were roughly equal and then pushed all the pins snugly against the ball.

Next I determined the center line for the ball. I encircled the ball with heavy thread, passing the thread over the center of the four overlapped corners.

I pulled the thread tight, traced the thread with a tapestry needle, removed the thread and centered a line of double sided tape over the line.

I used the tapestry needle to draw a line on the center of the double sided tape.

Then I cut made three short clips along each fabric edge, midway between the pins, to allow the fabric to better flatten against the ball.

Next I made the pattern for the ultra suede donuts.
I could have used ordinary paper to make my pattern but I chose to use freezer paper because, with the aid of a warm iron, I could temporarily stick the pattern to the wrong side of the ultra suede. (I often use adhesive vinyl when I make reuseable patterns, but I thought the freezer paper would show up better in the photographs.) The pattern basically has three concentric circles. The largest circle has a diameter that is half the circumference of the ball. The smallest circle is the size of the opening (For this project it is width of the design, 1 3/4 inches) and the middle circle is 1/2 an inch bigger than the small circle. (For this project it is 2 1/4 inches.)

Then I drew lines to divide the circle into 16 equal parts and cut out the inside and outside circle. Note that the slits stop at the middle circle, 1/4" before the inside circle.

Click here for a template for a pattern with a 1 3/4 inch opening that fits a 2 1/2 inch ball. If you would like a template for a different sized ball, or just a different sized opening, you can print the template and draw new circles or you can use a photo copier to resize the whole template. Or you can visit this blog page that has more detail on how to draft the patterns, with or without circle template or compass.
When the pattern was complete I used a warm iron to press my freezer paper pattern to the wrong side of my piece of ultra suede.
If I didn't have any freezer paper, or adhesive vinyl, I would have used small pieces of tape to fix the paper pattern to the ultra suede, like this.

Then I cut out the ultra suede donut. First I cut the outside circle, then I carefully cut the inside circle, remembering that it would be front and center on the finished ball. Then I cut the slits between the petals. (If I had used a pattern that was fixed to the ultra suede with tape I would have cut the slits before I cut outside circle.)

I carefully removed the pattern from the ultra suede and repeated the steps to cut out a second ultra suede donut. Now I was ready to pin the ultra suede "donuts" to the ball. I used sharp pins with a gold seed bead. First I pinned the ultra suede to the ball at the top, bottom and sides of the cross stitch design.
Note that, though the inside circle was cut the same size as the cross stitch ball it is now about 1/8" from the edge of the design. This isn't because the ultrasuede has stretched. It is because the hole in the ultrasuede fits over the curve of the ball.
I placed each pin near the edge of the inner circle, at the center point of an ultra suede petal. I used a pencil eraser to press each bead snugly against the ball.

Then I placed four more pins with beads at spots halfway between the existing pins.

Then I was ready to stick the top of the petals to the double sided tape. I chose one of the petals that had a bead on it, pressed it against the paper of the double sided tape and trimmed off any ultrasuede that extended beyond the center line.

Then I lifted the paper from that section of double sided tape and stuck down that petal. I pressed the opposite petal against the doubled sided tape and trimmed off any overlap. I repeated this process for all of the petals that had beads on them.

Then I gently pressed the remaining petals to the ball, trimming them off when they overlapped the center line.

At last all the petals were flattened.

I think that the double sided tape would have held the petals permenantly, and the ring of upholstery tape would have held the top pieces flat. But as a backup I used a needle and thread to run some quick stitches around the ball.

It now occurs to me that if one didn't have double sided tape they could temporarily pin and then loosely baste the tops of the petals at the center line. It would take longer than the double sided tape, but not as long as pinning through the layers of ultra suede, as I did on my earlier experiments.
The cross stitch designs were now neatly framed by the ultra suede donuts.

I pinned upholstery braid over the center line of the ball so that the ends of the braid were centered above the tops of the cross stitch designs.

I wrapped gold cord over the braid and tied it tightly so that the knot was at the top of the ornament.

I centered two lengths of wide ribbon over the knot and tied the gold cord over the ribbon.


Hmmm. With the eight beads around the circle this ornament reminds me of a compass. I wonder if I have any cross stitch charts of a Mariner's Compass or a Compass Rose...
POSTSCRIPT
A few weeks after I wrote the above tutorial I had the time to try this ornament finish using good quality felt (one that wouldn't stretch out of shape too easily). I was very pleased at how it turned out. The snowflake design is from Cross Stitch by the Month- January February March and I stitched it on 22 count antique white hardanger.

I decided that I didn't want any visible pins on the front of this one so after all the petals were securely stuck to the ball I removed the pins from the inside circle. It looked like this and for the right design it would have been perfect just like this.

However, to create the homespun effect I wanted for this ornament I used two strands of floss to sew a line of white running stitches around the circle. The side benefit is that the running stitches pull the inner circle snugly against the ball and it will be more resistant to stretching. I didn't have any white or blue upholstery braid to cover the center line, where the petal from the front and back meet, so I found some white grosgrain and used two strands of blue floss to sew running stitches along the edges before I fastened it to the ball. (I also considered using a strip of white felt.)

I discovered that a benefit of using felt, instead of the more expensive ultrasuede, is that it is very easy to poke needles or pins through two thicknesses of felt. One could easily fasten the petals of this ornament using pins, or needle and thread or double sided tape.
(Someday I should make a tutorial for the other snowflake ornament in the above photos. It is basically a sandwich of two ultrasuede circles and the center of the top one is slashed open with three intersecting cuts.
 >
>These slashes are gently folded back and the points are tacked in place. I'm not sure if this one would work in felt...)

Pinwheel 2011